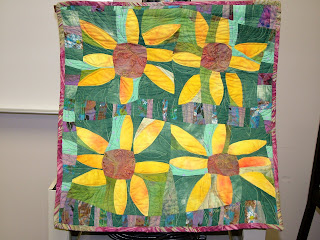
Pages
▼
Monday, August 27, 2007
Madison
I finally have time to write more about our visit to Madison. This first picture is of my DH and DD2 sitting along the Ohio River looking over at Kentucky. That night there was a balloon light show and I got a fairly good night shot (out of like 30)
At the Ribberfest (yes, I said "Ribberfest", NOT Riverfest) there was a competition and people dressed up pigs (stone ones not live ones). There was an Easter pig, an angel pig, a skeleton "Ham bone" pig and my favorite, Elvis pig...
I managed to get a quick shot of DD1 with her friend from Australia, Miranda. Hopefully her mum will see this too!
I have to tell you that I was quite traumatized by something while we were visiting. DD1 told me not to kill the spiders because they eat the crickets that get into her apt. Sill me, I was thinking Michigan crickets, not Indiana CRICKETS!!! Holy, moley!! DS took me outside to show me the cricket "nest" and opened the dirt celler next to the apt. Well those crickets turned and LOOKED RIGHT AT ME, ahhhhhhhh!! I told him to close the door quickly. I ran to get my camera because I figured no one would believe me when I told them about the crickets. They were HUGE!! and looked like they had mated with spiders, their legs were really creepy!! So here you go, cave crickets, run away in terror!!!
On to nicer things...I decided to walk around the twon so the next photos are some that I took, I don't have time to post all of them. first I saw this neat old barn. Aren't the stones great?
then I went by this cute pond in some one's backyard, and aren't those plants on that legde great? I would forget to water them and they would die.
The downtown is so quaint and charming. Look at this cart of flowers. It made the shop very apealing.
Then, my favorite, Margies!! The quilt shop, tada!!
Thursday, August 23, 2007
More from Madison
I finally finished this UFO, got it quilted and finished the binding in the car onthe way to Madison. It was one of the first tops I ever made. I learned how to do the Stack and Whack technique and this was the quilt. I actually made 2 of these and this one is the second one. I just got the first one back from the quilter last week, but it is not bound yet. I thought that DD1 would love the purples in this one so I took to to her. You can see the amazing quilting my friend Liz did for me on this. I asked her for dragonflies and she did those plus more. She did these really big flowers in the stars and some other flowers with outlining in the pinkish inbetween space with dragonflies and loops all around it. She used silver metalic thread on the front and purple on the back. I am just thrilled with how it turned out!
We went to the antique shops while we were in Madison too. I found a darning egg just like my mom used to use to mend our sox with. Back in the day, Madison used to have a button factory and they made shell buttons from the fresh water clams that lived in the Ohio river. I was so excited to find this clam shell with the buttons cut out of it. Isn't it amazing??
In addition, I have been looking for vintage hankies that are in teal/aqua. I hit the mother load in one of the shops!! Arent' these gorgeous?? Someday I would like to make a hanky butterfly quilt.
I have more photos from the festival that I will post later.
Wednesday, August 22, 2007
What a wonderful week!
What a whilrwind of a week! I apologize for not writing sooner but you will soon see why. On Thursday I had to go to my father's house and pick up some things to bring to DD#1 in Indiana on friday. So I decided that I may as well make the best of it and called my friend Yuki to go on our own personal "Shop Hop". We ended up traveling to 4 different shops on our way from Ann Arbor to Grand Rapids. The first stop was a quiant little shop, Jennifer's Quilt Shop. They have a good deal on their fat quarters 11 for $20.00 I love this shop. This is a photo of Yuki and Jennifer at the shop. I think we liked this shop the most of all the shops we visited. The next stop was The Stitchery in Howell. It is a nice shop with a lot of batiks. They were holding some fabric for me to work on finishing DD#1's dragon quilt. I didn't think it was quite the right purple, but I didn't have the original and the numbers were correct so I bought it anyway. Then off to Lansing and Country Stitches. I found the correct purple there! Oh well, I will find something to use the other purple in. I got the cute new Thimbleberries panel with the bear and the bunny on the swing so I was happy. Then we were off to GR. There is a smeall shop by my dad's called The Attic Window. It is a small shop but boy did they origami a LOT of stuff into that small space!! Yuki did a lot of damage here! I didn't have anything specific to buy but I managed to find a few things that needed to go home with me : )
We then went to my dad's and picked up the things I needed to move to IN. My dad and my sister took us out for dinner at Perkins. It was a good day. Kind of a long drive home and Yuki and I were tired, but happy!
Now that you know that I went to Indiana (the entire family, actually I have a lot of pictures to share so I will be doing that over several days. First I wanted to show you the finished table runner that I began at Quilt University. Shelby loved it!
I don't know if you remember that her friend from Australia is visiting her but she will be with her until sometime mid September. When Shelby went to Australia 2 summers ago I made a quilt for her to take with her for her friend as a thank-you for allowing her to stay with her and carting her everywhere. Maz wanted something to remind her of a Michigan winter. The first thing I thought of was snow. So I made a quilt that was all pinwheels on various blue backgrounds ranging from very dark blue to very pale blue to simulate that snow begins way up in the dark sky and ends up in a white snowy pile.
Turns out Maz's mum is a quilter! She made a quilt for Shelby and Maz brought it with her. It is also a night sky and she made the blues progress from dark to light with gold stars set in. The neat thing is that if you look closely, some of the stars are friendship stars depicting the constellation of the Southern Cross, which she drew out on her label!! Isn't she clever!!?? Her folks own a 3000 acre sheep farm so I thought it was really fun that she found some light blue fabric with sheep on it to incorporate into the quilt.
Shelby loved the quilt and Maz wraps up in it while she is here to stave off the home sickness. She is a really nice girl and it is nice to have international friends. They actually met in a writing group online several years ago. I corespond with her mum now and maybe someday I will be able to visit her. I just received an email this am from one of the exchange students we hosted when DD#2 was in the 5th grade (she is starting 2nd year uni this year). He will be coming to the US soon. apparently he is going to study for a semester in Montreal. I hope we can make plans to see him while he is here. I will write more later, I have to go and get some work for my job done now!
Thursday, August 09, 2007
More QU
These are from my class on Sunday. Some of the ideas were similar to the Friday class but I still learned some things. It sure made for a long weekend though. I think next time I will only take 2 classes unless there is something I *need* to take, lol. This first picture is an example of what we were learning at the beginning of the class. It was difficult to know what to bring, fabric wise, because I had no idea what we were going to make.
Here is what 2 rows of "mine" looked like. I really enjoyed makinn the border for this.
She had also used this technique to make pagoda blocks like this
At the end of the class she showed us how to make the blocks for this quilt. I really liked this one and it was a neat way to use your scraps up.
She took strips about 3 inches or so (not firm on the measurement) and freehand cut them into wedges. The wedges were put together with the larger part on top to form an arc. She then laid the arc on an 8" square of background fabric and freehand cut around the arc. The background arc was taken away and the pieced wedge arc sewn into the block. Isn't that fun and easy? She called this one "Fruit loops". Appropriate, right?
I just got the Michigan top back from my friend Robin. I appliqued all the "M's" and cut out the quilt and she sewed the top together. Now it is back to me to put the borders on it. It is pretty "IN YOUR FACE, Michigan! But the U of M fans are pretty supportive of their school too. I am hoping to get the borders on this weekend. I also got the last of the pansy blocks back last night from the Church Ladies (CL). I will put the blocks together this weekend too but the border fabric I want I either have to order on-line or I have some friends that will be going to a HUGE fabric shop on Sat and maybe they can find it. (I'm hoping for the latter, less shipping, so keep your fingers crossed!! I got my Jack-o-Lantern wall hanging and my Winnie the Pooh quilts back from my longarner friend so more binding!! (I think that makes 6 or so I have to put on and turn). I have managed to sew the bining on all but these last 2 but they still need to be turned. Last night at the meeting with the CL I brought the Turning Twenty I made thinking I might get to begin turning the binding, but no luck. One of the women told me she loves to sew it down by hand and took the quilt to do it for me!!! I am blessed.
Tuesday, August 07, 2007
Quilt University part 2
Easy and elegant Lone Star. This was the class I took on Sat. It was my favorite! My friends Ellen and Yuki were taking it with me. I have made friends with another woman in the guild and she happened to be in the class also, so that was fun. This was a fabulous class, the teacher, Judy Thornotn, was excellent! We spent most of the morning trying to decide how and where to actually cut our fabrics and how big of a star we wanted. Mine was easier than some as I wanted the dragon as the focal point. I had to make a large diamond to get most of him in. Yuki on the other hand had such fabulous possibilites it was much more difficult to make a decision!
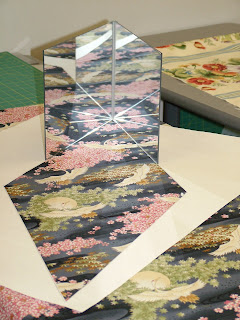
This is Yuki working with her cardboard window and mirror to view potential stars.
Here is what the start looked like using the cardboard preview window and our mirrors. This one is Yuki's.
This one was mine.
This one was Ellen's.
Here is Ellen acting like a goof. I am *certain8 she will KILL me for posting this one. I guess next time she will smile nice!!
Here is Yuki, *trying* to figure out where she wanted her star to go. It was a difficult choice!
Behind me is the class example. It was really spectacular. I chose the dragon fabric because I wanted to make this for my DD#1 and she loves dragons and purple!
Here is Kimber's top. She had the most difficult time trying to make her star because there were bare spots without a lot of interest in some of her fabric. I think she made a good choice for final placement. She used denim like fabric for her background. She wanted a western look.
I really liked this one. The ribbons gave it such movement and of course I loved the dragonflies too.
Yuki just sent me this. She finished her top at home on Sunday. Isn't it great!!? I just love her fabric choice!
Ellen chose an oriental fabric with cranes on it. It was neat because the wings made fantastic circles. It kind of reminded me of a hurricane!
This is how my top looked. We had to sew the quilt top together in quarters. I got an entire half sewn together and then one quarter. I just put them all together for the photo. Isn't it spectacular?? i relly loved it!!
I took a couple of close ups too. This is what the center will look like once it is finished.
This shows the actual diamond I used.
This class was so much fun. The technique was not as difficult as I thought it would be either. I think I will make more of these. I did get a couple of nice tips from Mary and Judy (the teachers). Mary brought tissue boxes, (you know, the ones where the tissues pop out of the top?) and we kept them at our sewing table to use for threads and scraps. You could also keep one in the car for trash. Judy showed us a way to keep your rulers so they won't get broken during transport. You know those cardboard bolts that are left over when you buy your fabric? She used those, put 3 elastic bands that she had safety pinned together around the board and slid her rulers under the elastic. Isn't that a great tip?? Let me know what you think of the class and the finishe (almost) projects!!
Monday, August 06, 2007
Quilt University
QUILT UNIVERSITY!!!
I took 3 classes this weekend, as you probably read about on my last post. The first one was all about free form piecing. Drawing with your rotary cutter, if you will. It was an interesting class, to say the least. I was WAY, WAY outside of my comfort zone! I did learn a lot, though. Here are some pictures of the things our instructor, Mary made. First is Mary with the leaf table runner we made.
This is the first thing we did. We stacked four 12 inch squares and cut circles through them, shuffled them and sewed them back together. This showed us how we would be doing our leaves.
Mary's brown evey susan quilt.
Mary's Tree
I loved the dragon flies so here are some pictures of those. The leaves we made were like the wings and she showed us how to do those too.
Mary's blue Carrots! I just loved this. Her first one had orange carrots on blue background, but when you cut one you get an opposite, so here is her opposite! Isn't the fun fur yarn she used for the tops of the carrots great?
This is how my leaf runner turned out. Then I had to choose borders. This was one combination. I ended up using the green as the first one followed by the blue and purple. I had someone take my picture with it but it was blurry: ( I will take another one later and post it then so you can see. We made "wonky" borders too.
I have to go and do some actual work for my job so I will post more from the classes later! Let me know what you think of this.