Friday, December 09, 2011

Blog Hop Party

OK, I drank the kool-aid.  I joined in the Quilter's Blog Hop Party.  
What is this you say? 
If you go here you will find out.  C'mon join in on the fun!!


You have to have a quilt related blog and be willing to give something away.  
I have a quilt related blog.
But what to give away?

I think my give away will be 2 embroidered tea towels!  
I have not done them yet (of course not why give away something that's already made?)
So I am unable to show you just now what they will look like.  
Suffice it to say I will post as I am working on them, how's that?
The giveaway officially begins tomorrow so I will take a photo of the tea towels and we will discuss the details of what you will need to do to win them!  
Sound good?
See you back here tomorrow!
~XOP~


PLEASE LEAVE COMMENTS FOR THE GIVEAWAY ON THE POST DONE DECEMBER 10TH

Christmas Link Day 9

I hope you are enjoying the links I am listing. 
If you make something I would love to know! 
Again, no sewing for me last night. 
I did make venison stroganoff for dinner and then made 2 dips to bring to the lab Christmas party that will be this afternoon, so there's that.  
I bet you are looking for the link for today right?

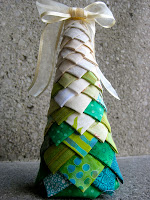
I found this amazing Snow Capped Christmas tree at My Patchwork and not only is it adorable, it looks like a good way to use up some scraps!  Oh and it is EASY!

(Photo from My Patchwork Place)

Now who doesn't love Lynette Anderson?  
Well she has some free Christmas "to do" lists you can print off for free!!
They are so cute and I always seem to need papers for making lists.

OK quilters, that's all from me for the minute.  
DH and I are off to a wedding reception tonight and the Dicken's Festival in Holly, MI tomorrow.
Woke up to a snow covered roadway this morning so glad I go into work early!

Have a wonderful day!  ~XOP~


Thursday, December 08, 2011

Christmas Link of The Day

I actually have a couple of things to share with you all today.  My friend, Mrs Goodneedle, shared a story on her blog today that is very worth reading.  I could not agree more with what the author had to say.  Please take just a few minutes and hop over to her blog and read it, I promise you won't be sorry you did.

The Christmas project I am sharing today I found on Martha Stewart's website.  Candy Cane Mice.  How cute are these little guys??  You can find the directions here.  Have fun making these!!


I have also run across some Squirrel Christmas Cards by Amy Schimler that you can print out.  So if you are looking for an adorable Christmas card, now you have one! 

Have a wonderful day!!  ~XOP~


Wednesday, December 07, 2011

Embroidered Christmas Tree

The link for today takes you to Better Homes and Gardens to see the adorable Embroidered Christmas tree.  Just go here for the info.  My friend Barb has made a couple of them and is going to frame them using frames from the thrift shop.  Tell me how adorable these are?


Fabric and button tree

Fabric and button tree

They are done using circles of fabric, buttons and embroidery. We all have small scraps of fabric so this is a neat way to use those up!

I went to the thrift shop recently and found a great vintage sheet. I had this sheet when I was a little girl and have been hoping to find one eventually.

Vintage sheet find

That same day I found a GREAT vintage table cloth. I was so thrilled!!

Vintage table cloth score

It's not really lumpy, but I spread it out over my down comforter to get the photo before I went to Zumba. Not a stain on it either!

Stay tuned for another great Christmas craft site tomorrow and remember if you have a site please send it to me. ~XOP~


Tuesday, December 06, 2011

Handmade With Love - A Holiday Tutorial Contest


Kathy over at Pink Chalk Fabrics is hosting a contest.  You can find all the information over here.  If you have written a tutorial in the past year (2011) you can post a link to it and be entered into the contest.  I entered my tutorial on making a chenille blanket.  There are 3 categories.  LOTS of great stuff!!  That my friends is my link for you for today.  Go and check it out.  Enter if you have done a tutorial too!! ~XOP~


How To Make A Chenille Blanket Tutorial

I have made so many of these and I have had numerous requests about how to make one so Merry Christmas!

What you need:

1 yd  cotton for the backing of the blanket (sometimes I get just a little over a yard, so I have room to square it up after I line up the flannel and sew it)


Four 1 yard cuts of flannel (you can use different colors or all the same) 

A roll of masking or painters tape (you will only be using a few feet)

I have found that my favorite color combination is using 2 colors of flannel.  The Chenille is two of the same with a different one in the middle.  The middle color is also the one closest to the focus (bck) fabric.

For example layer like this:

Focus (back) cotton fabric, face down, 
(^spray baste) then flannel A, 
(NO SPRAY BASTE HERE) flannel B, 
(^spray baste) flannel A 
(^spray baste) flannel B.

Another way to say this:

1st layer is cotton face down
2nd layer is 1st flannel
NO SPRAY BASTE BETWEEN THESE 2 LAYERS
3rd layer is 2nd flannel
4th layer is 3rd flannel

5th layer is the final 4th flannel.


            Make sure your flannel is colored all the way through, Cozy solids from JAF are great for this!


½ yd cotton fabric for the binding


Press all fabric before starting but do NOT pre-wash!!  I can't stress this enough.  
DO NOT PRE-WASH YOUR FABRICS

***I'm going to edit this right here**
I no longer baste the layers with needle and thread.
I use spray baste.
Lay the focus fabric face down on a flat surface and spray with basting spray.
Lay the first flannel on top and smooth into place.
It is helpful to have someone assist you with this.
When you put the next flannel DO NOT USE THE SPRAY BASTE ON THIS LAYER.
WHY? Because this is the layer you will need to cut to.
Now you will spray baste and add the third piece of flannel.
Smooth into place.
Spray baste after placing the third flannel piece into place.
Add the fourth and last flannel layer and smooth into place.

If you want to baste with needle and thread follow the directions in the next paragraph.

Lay the backing fabric on a large surface face down.  
Layer the flannel on top of the backing, right side up.  
Smooth each layer before adding the next.  
Once all 5 layers are smooth place a long piece of tape diagonally across the quilt. 
 Using a basting needle and thread baste the layers together. 
 Baste using a big and then a little stitch and stitch about 3 inches from your last line of basting following the tape line. 
(In this picture the blanket is upside down, it's best to put your cotton on the bottom and 
layer up the flannel.  
I don't have another photo to put here but trust me put your cotton on the bottom and 
then the flannels.  
You want to be sewing with the cotton closest to the feed dogs)
 
-->

Now for the fun.  
Using your walking foot with the stitch guide attached, stitch along one side of your tape line, then you can remove the tape.   
Using your stitch guide to help you continue stitching, on the diagonal 5/8 of an inch from your previously stitched line until the entire quilt has been stitched.


It should look like this when all the lines are stitched.


Using chenille cutting scissors (or a chenille cutter), cut through the top 3 layers.
 DO NOT CUT INTO THE 4TH LAVER OF FLANNEL!!
 Once all your lines are cut you will need to square up your quilt.
 Do NOT square it up until you are done cutting your channels!!
 (ask me how I know this, LOL)


Here is how it looks when you are done before you square it up.


To square up the blanket I fold it in half and use the fold line as my straight line guide.
 I then trim off each side.
 I then fold it in the other direction and do the same thing.
 Once that is done, I fold to make sure all the corners line up with each other
and that it really is "square".


Now you need to make your binding. I make it using a cotton fabric (not a flannel). I cut 2.5" strips, join strips to make one long strip,fold in half and press.
 Attach to the flannel side of the quilt using your sewing machine.
 I turn and hand stitch to the back (the cotton side), or machine stitch the binding in place.
 I have begun to put labels in my quilts by putting it into the binding or I use a stamp I had made.


Now is where the fun begins! Wash and dry your blanket to make it "fluff" and ENJOY!!

Your finished blanket should look like these:


If you have questions I would love to help you, BUT you need to leave your email address.

You may email me directly if that's easier too.

My email is mamaspark@gmail.com

If you happen to make one I would love to see it.
 Please upload it to my Flickr group!  I would love to see your creations.
 I hope you have enjoyed this tutorial! ~XOP~


Monday, December 05, 2011

Occupy Your Sewing Room

Now why didn't I think of this?  What a wonderful plan Barbara has put together and an amazingly clever title, I must add!


Here is what Barbara says on her blog:

Here's a blogging event for our times!

1. Occupy your Sewing Room will run from December 3 - 10, 2011. During that week, plan to occupy your sewing room for a full day. If you can't spend a whole day, then divide it up into whatever increments you like.

2. Write a blog post and then come back on December 11th to link up and show off what you've accomplished. This is a chance for you to finish up those Christmas gifts you haven't had time for, but you can work on whatever you like. And if you don't have a blog, feel free to post an image from Flickr, Shutterfly, or any other photo sharing service that allows you to generate a URL. Just be sure I have a way to contact you or you won't be able to win in the giveaway. No-reply bloggers, that goes for you too!

So if you want to do something useful let's unite and Occupy our Sewing rooms!! Go grab the button and quilter's of the world unite!!

"Our list of demands is short. Leave me alone, I'm sewing!"


Christmas Tutorials

As I was surfing the web I found quite a few wonderful tutorials or free projects.  It got me thinking that you might like to see them too.  So I am going to put up one every day for as long as I have them.  If you have a link to one that you think others would like to have too, please email it to me and I will use it.  My email is  mamaspark@gmail.com  I am looking forward to hearing from you.

Today I found the cutest little stitchery over on Gail Pan's blog.  It is only up for the month of December but it is adorable!
(Photo from Gail's blog)

I also wanted to share a cool thing I found for decorating.  I was out buying the cedar roping for my house and found an evergreen ball (not sure how else to describe it).  I took a photo of the one I bought that is hanging outside my front door.  Pretty cool huh?

Evergreen ball

I finished the first of the 3 Halloween tumbler quilts I am making, now it is off to see Liz!

Halloween Tumblers

Of course I couldn't have done it without my kitty helpers

Hallie

I also finished my next star in the FQ Star QAL.

FQ Star block

That's all the quilt related content that I will have now until after the new year, I think. I have some bindings to do but I had to put my sewing away so I can get out Christmas. I got everything all picked up and put away. After toting 4 56 gallon tote bins to the basement full of fabric I think I have no business buying any more until I can use some up! That's why those Halloween ones need to get done as they will use up all my Halloween flannels! I need to make a new "to do in 2012" list and work really hard to finish up some of the quilts I have bought materials for in the coming year. Right now there are 3 lines I am looking forward to getting so I really, really need to get to work!!

I will be posting new sewing/crafting tutorial links so there will still be some great things here. Come back soon!! ~XOP~


Friday, December 02, 2011

Paper Pieced Santa Ornament

THE ORIGINAL BLOG HAS BEEN TAKEN DOWN.
THIS IS NO LONGER AVAILABLE
SORRY = (


I found a blog with the cutest little paper pieced Santa ornament on it today, so I thought I would share.

Stop on over to Pinwheel Ponders for the download. 


(Photo from Pinwheel Ponders blog)

Please let her know how much you love her ornament! ~XOP~


Thursday, December 01, 2011

Christmas Sewing Tutorials

I found this great blog that had gathered up a bunch of wonderful Christmas sewing tutorials all in one place.  I just wanted to take a minute to share them with you.  It's over at Teresadownunder's blog.

Here is a peek at the photo on her blog but she has all the links there too so pop on over and check her out!  Tell her Mama Spark sent you.


Believe me, you want to go and take a look at her wonderful blog. LOADS of inspiration!!
Have fun exploring!! ~XOP


I Did It!!

I blogged every single day during the month of November!!  It was a challenge to have something to write about every day and I have no idea how people do quilt related posts every single day.  Kind of gives a new appreciation.

Yesterday I had a doctor's appointment, a consultation really, but that's a topic for another time.  It was quite a way from my home and my work so I just took the day off work.  The appointment was in the morning so I had the rest of the day to do whatever I wanted/needed to do.  I went to Lake Street Mercantile and looked around but didn't buy anything.  Then I went home.

As you saw from the post yesterday, I put the binding on my quilt.  We had to purchase a new stove and it was delivered just as I was walking up to the house!  DH was there and he was supervising.  So that's when I worked on the binding.  He wanted to know what we were going to do about lunch and I suggested we go out to one of our favorite places (I'm not usually home for lunch out).  We went to Chopstick House and it was YUMMY!  Then we drove to get the cedar roping we usually put up on the front of our house.  This year they had this really cool evergreen ball.  I have no way to describe it to you so I will take a photo tonight when I get home to show you, but it was COOL!  DH even thought so and he doesn't usually care much about decorations.  Next stop was the Sally Ann for a working VCR.  DH picked one up for $10!  He is trying to copy our old video tapes on to DVD and our old vcr was not working.  I got this cool duck dish!

Duck Dish

I now have 2 different duck dishes, 2 bunny dishes and one chicken dish!! DH asked me what I was going to do with it! Pffft, why put stuff in it of course, duh! When we arrived home this is what greeted us:

Mosen

"Oh excuse us Mosen. Did we wake you up?" LOL He thought Holly's Mom's quilt was the purrrrfect place to rest!

In short time it was time for Wednesday night quilting. I brought the Halloween tumblers I had cut out with me to lay out. I cut out 3 quilts worth and thought I would take advantage of a BiG space to lay one of them out while I had it. I am going to love these quilts!!

Halloween Tumbler #1

Please pardon my shoes!

Halloween Tumbler #1

They should turn out to be throw sized. When DD2 was home she wanted me to hurry up and finish hers so she could cuddle up with it! What do you think? Would you cuddle up with this? ~XOP~


Wednesday, November 30, 2011

Holly's Mom's Quilt

I have a really especially dear friend.  Her name is Holly.  We have been friends for as long as I have worked at the University, almost 27 years.  I was responsible for introducing her to my boss and now we work together and have for about 25 of those 27 years.  We think alike, we never fight and sometimes people think we are the same person, LOL.  Whatever one of us doesn't know the other one does.  If she were a man she would probably be my soul mate, LOL.  Her life has been incredibly challenging, and not in a good way.  Amazingly she is one of the most generous, kind spirited people I have ever met...EVER!

A few months ago now, her mom gave her some photos she had taken of wildlife from where she lives.  She had transferred these photos onto fabric.  Holly gave them to me and passed along that her mom would like me to make something for her from them.  OMG...but what?  I talked about this once before but I really struggled with how to put these all together.

I finally framed each photo and then used all one color of sashing to surround all the pictures.  I didn't want to take away from the photos so decided to use something woodsy.  Then I had to figure out how to have Liz  quilt it.  I looked all over the internet.  I finally found a scene that had plants with a pond in the middle.  Her mom also loves frogs so I found a cute border of frogs.  Liz came up with triming out the photos and making the pond plants go around the photos.  Over all I like the quilting, I just wish the quilting stood out a little more.

Here are the frogs

Frogs in the border\

And the plants with the frogs

Pond Plants and frogs

More of the plants

Pond plants

Pond plants around photo

This is what the entire quilt looks like. I have sewn the binding on but need to hand turn it. I used Kona black for the binding. The back is a green, white and black plaid flannel, which I really like.

Holly's Mom's Quilt

I know it's not the best photo, but you get the idea of what it looks like right? I am very happy to be almost finished with this quilt. I hope Holy's mom likes it.  It was made with a lot of love. ~XOP~

Thanks for stopping by!  Leave me a comment and let me know what you think!

Tuesday, November 29, 2011

I Just Thought I Would Share

So if you are squemish, STOP reading right now, seriously, STOP.  

Remember that my dog bit me last Tuesday?  I was talking to one of the doctors at work and he freaked out that I had not filled my prescription for antibiotics.  So he made me walk over to the pharmacy yesterday and get my prescription filled.  It looks much better today, but still really, really ugly!   I know you are dying to see how it is healing right?  Well wonder no longer here you go.  First is the bite on the top of my finger, notice the blue bruise line the length of the nail.  N-I-C-E!

Dog bite the other side

Now remember this is one week later, but this is the bad side. There was a flap of skin about half an inch long and I could not stop the bleeding. Look how much better it looks now!!

Dog Bite on the pad of my finger

The one on the pad of my finger still hurts and the dead skin is catching on things too. I didn't realize how much I used my pointer finger! LOL. I use it for applique, for hand stitching down bindings, and for rotary cutting!! YIKES!! Please heal quickly finger!! I have lots to do.

Hope you guys are all well too. Anyone else been bitten? ~XOP~