Thursday, January 26, 2023

Unicorns Galore

 I made a unicorn quilt previously to pattern test the Unicorn Garden pattern by Apples and Beavers.
You can find the pattern here if you need one in your life.
It is a very well written, easy to follow pattern.
Do you remember it?
I didn't have anyone specific in mind to give it to.
My sister-in-law told me that her grandgirls would LOVE a unicorn quilt.
In this case it means I would have to make 3 more since there are 4 girls.
I decided I would make them so began the adventure of cutting them all out.
I hope to sew at retreat in February.
I am adding a crown to 2 of them and a bird to one.

Here is my original quilt top, prior to quilting.


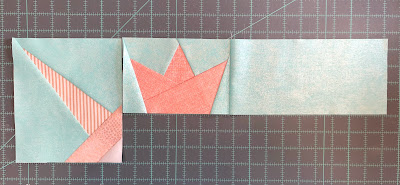
The horn, crown and bird are all paper pieced.
I have finished 2 horns and 2 crowns.
I have one entirely cut out and am working my way through the second one.
I just have the background left to cut for that one.


I can't wait to get to the next one so I can make the horn and the bird!

What are you working on?

~XOP~


Saturday, January 21, 2023

My Life

 Since we have been home from NC life has been a little hectic.  
I have been going to see a lymphedema specialist for fluid retention after my radiation.
The massage techniques I did before going helped it to all be gone.
The therapist gave me more to do.
In addition she gave me a lot of stretching exercises.
It appears that radiation can cause adhesions and make the scar hard.
It also restricts my arm movement a bit.
She said it is not uncommon for breast cancer survivors to develop rotator cuff injuries.
It seems we compensate in a way that harms our rotator cuff.
So I am learning new stretches.
They help with movement and with keeping the scar supple.

For Christmas we got our eldest daughter stuff to make sourdough bread.
She has made LOTS of bread.
She also discovered that she could make biscuits from the discard.
She brought some of the discard over the other day and I made biscuits today.


I had to take my car in to get the bumper fixed after a mild accident while I was in NC.
Finally got that back.

My regular sewing machine had to go in for service.
The cable that allowed me to use the hands free system frayed.
That meant I could not use hands free to lift the presser foot.
I didn't realize how much I used this until it was broken, sigh.
I got that back yesterday.
It's been a crazy few weeks!

I finally got in to get a haircut and highlight.
I haven't had a haircut or highlight since last summer.


It feels so much better!
I found a new slow cooker recipe for candied pecans.
Can you believe these are sugar free??
They were amazing!!


On top of all of this, I have been binding quilts as fast as I can.
It is so much easier to do the machine binding on the Bernina 770!
The LED lighting is AWESOME!

It has been raining here so no pics of the most recent bindings.
I went to bind my oldest WIP only to realize that I don't have enough of the fabric I need to make enough binding.
I am not sure of the name either so I took my best guess and placed an order.
We will see when it gets here is it is the right choice.
Fingers crossed!

~XOP~


Tuesday, January 17, 2023

Trick-Or-Treaters

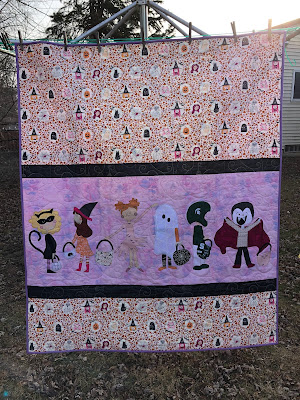
 I have finished binding my pattern test quilt from Meags and Me.
It's called Trick-or-Treaters


I just love these little Trick-or-Treaters.


I used fabric from the Art Gallery line, Spooky and Sweeter for the upper and lower part.
I used a Grunge for the applique background.


I had to piece the upper and lower part because the pattern was wider than the fabric.
If you look closely you can see where I pattern matched down the skeleton.
It's a bit tricky but worth the effort, I thought.


I finally figured that if I had shrunk the applique section by 20% I could have used the WOF without having to piece the top and bottom sections.
I would suggest that if you are planning to make this you consider doing that too.
Alternatively, you could use a smaller print that wouldn't matter if it matched.
It is such a large area I thought this print would be too cute to pass up using.


In the end, I really love this pattern.
It was a fun one to make.

Next up I am working on finishing up another Meags and Me pattern test called 
Little Nugget.
It's full of Hedgehog goodness so you will NOT want to miss it.

~XOP~


Monday, January 16, 2023

Perfect Pinwheel Center

 I'm working on making a pattern that requires a bunch of pinwheels.  
I don't know about you but I have always struggled to get my centers "perfect".
I think I stumbled on a way to do it!
I'm going to share with you now.

I did starch my fabric first, I find this helps everything stay nice and flat.
I made my initial squares  larger than I need so I can trim the finished block to size.
I started with 1 colored and 1 white cut at 6".
I put them right sides together and stitched 1/4" all the way around the squares.


I cut on the diagonal once.


Then I cut on the diagonal the other way.


You can see that this gave me 4 HST,


Next up was to press.  
I pressed to the dark side.
I trimmed all the dog ears off each of the HST


So now we have 4 pressed and ready to sew HST.
Pretty pinwheel.


I put the top 2 HST right sides together and the same with the bottom and 
sewed 1/4" along where I was pointing.


This is what it looked like all sewn.


I then pressed the seam to set the stitches and opened up the seam to press both of them open.
First I pressed on the back, then I flipped it over and pressed from the front.


You can see here I put a pin in the top where the seam needs to match with the one on the bottom.


I then put the same pin into the seam on the bottom.
This is how I want them to line up when finished.
I also pinned both blocks together where I will begin and end, so they are lined up.


Here is where the magic happens!
I used a few dots of Elmers washable school glue where you see it on the bottom.
I left my pin still in the seam.


Now I had piled up all my FQ on my ironing board and that was perfect for the next step.
If you don't have a pad, you could put down some batting or use a wool pressing mat.
Remember that center pin?
Well after I put the glue, I pinched it together with my fingers and took it to the ironing board.
I pressed that center pin in to the pad (in my case fabric) on my ironing board.


Leaving the pin stuck into the ironing board, I took my hot iron and set the glue by pressing where I had the 2 pieces stuck together.
You can see the iron is up against my pin.
This dries the glue and makes your center so it won't move when you sew it!


NOW you may remove the pin and voila, you are ready to sew!


You can see how I pinned both ends to get things to line up but there is now no pin in the center.
Time to take it to the sewing machine.


I am sewing a 1/4" seam and as you can see I'm about to sew over my glued center.


Your stitching line should be just at the point like in this photo.
Because we glued that bit you will need to gently open that up before pressing the seam open.
It doesn't take much force, just gently open that area.


Once you have that opened then finger press the seam open.
Follow this by pressing with your iron as shown.


I like to turn the block back over and give it a good press from the front too.


Just look at that center!
PERFECT!!!
Now you can trim your block to whatever size you need.


I hope you find this tutorial helpful.
Please share with your friends!

~XOP~


Purple Peacocks

 I did some pattern testing for Cake Stand Quilts.  
Of course it is near and dear to my heart being peacocks and all.
My eldest daughter raises purple peafowl.
I decided that I would make my version with purple birds.
I used a mint background.
My LAQ did peacock eye feathers for the quilting.
I LOVE it!


I used a Tule Pink for the vase.


I found this cute print for the back.
It's a wall hanging size.


I am hoping to be able to gift it this week to my daughter.
Stay tuned.

~XOP~


Sunday, January 15, 2023

First Finish of 2023

 I used to donate plasma twice a week for about 2 years.  
Sometimes my right arm was difficult to hit, enter Brittny.
She was always able to hit my vein on the first try!
Spending so much time at the plasma center I got to know her pretty well.
She and her hubby were wanting to have a baby.
I had to stop  donating because of the breast cancer medication.
She emailed me to let me know they are expecting a baby!!
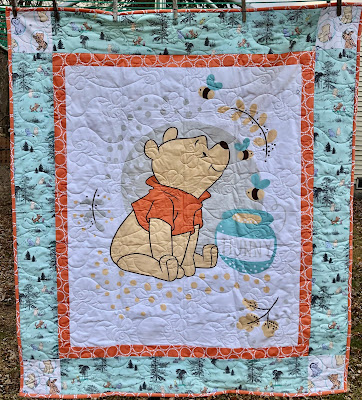
They are doing the nursery in Winnie the Pooh.
So of course I had to make some stuff for the nursery, right?

I got the quilt top done before we went to NC.
That meant I was able to get it to my LAQ before I left too.
I used a great Winnie the Pooh Minky for the back.
I was also able to make a few other things for the nursery.
I made some self binding blankets, using WTP Minky and pink flannel.
They came out really cute!


I made 2 crib sheets, one flannel and one knit.
I used the leftovers to make burp cloths and reusable wash rags too.


I got the quilt back all quilted up with Bees!!!
It turned out so darling!!!
I really wanted to use this panel for the center but I didn't have one.
I went online and traded to get it.


Look how cute this Minky is too.
Bonus that it is super soft.


I messaged her and asked if we could meet up on Saturday at her work.
I told her I had a little something to drop off for her.
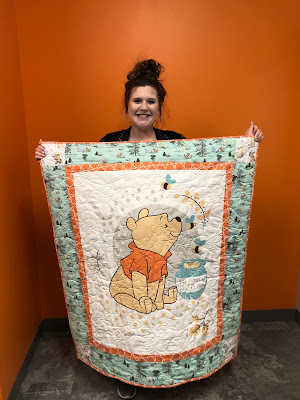
She was completely blindsided and so thankful.
I think she loved all of it!


I took a pic of the two of us.
Isn't she so cute too??


And guess what the baby's name is going to be?

AVERY Jane.

Can you believe that?  
Baby is due next month and now her layette is ready for her!

~XOP~