
I don't usually join in these things but my BFF Pauline (Quiltin' Queen) is hosting
so I wanted to support her and join in the hopping mania.
Any of you who know me know that I am sometimes a bit of a rebel.
I did ask if we could make something other than a pillow and she told me yes.
I don't really like making pillows, so this will be a tutorial for something a little different!
OK so here goes!
I decided that first of all "Holiday Lane" could be any holiday right?
You all know my favorite holiday is Halloween so my project is Halloween themed.
I want to thank Jill over at Jillily Studios for her pattern it was easy to follow and
easy to adapt to my finished project too.
I decided instead of a pillow I would be making a sewing machine cover!!
I hope you would like to join me and make one along with me!!
The first thing you need to know are the dimensions of your sewing machine.
You will need the:
My height was 13" Length 18.5" and width 9"
To calculate your dimensions:
Width 18.5" + 3"= 21.5"
^
your length here
Length 13" x 2 = 26" + 9" = 39"
^ ^
Your height here Your width here
I hope this makes sense to you! It is a little confusing!
You will also need
~48" of ribbon cut into eight 12" lengths, color and width of your choice.
Batting and fabric for center of cover and the back (based on your measurements)
small bits of fabric for embellishments.
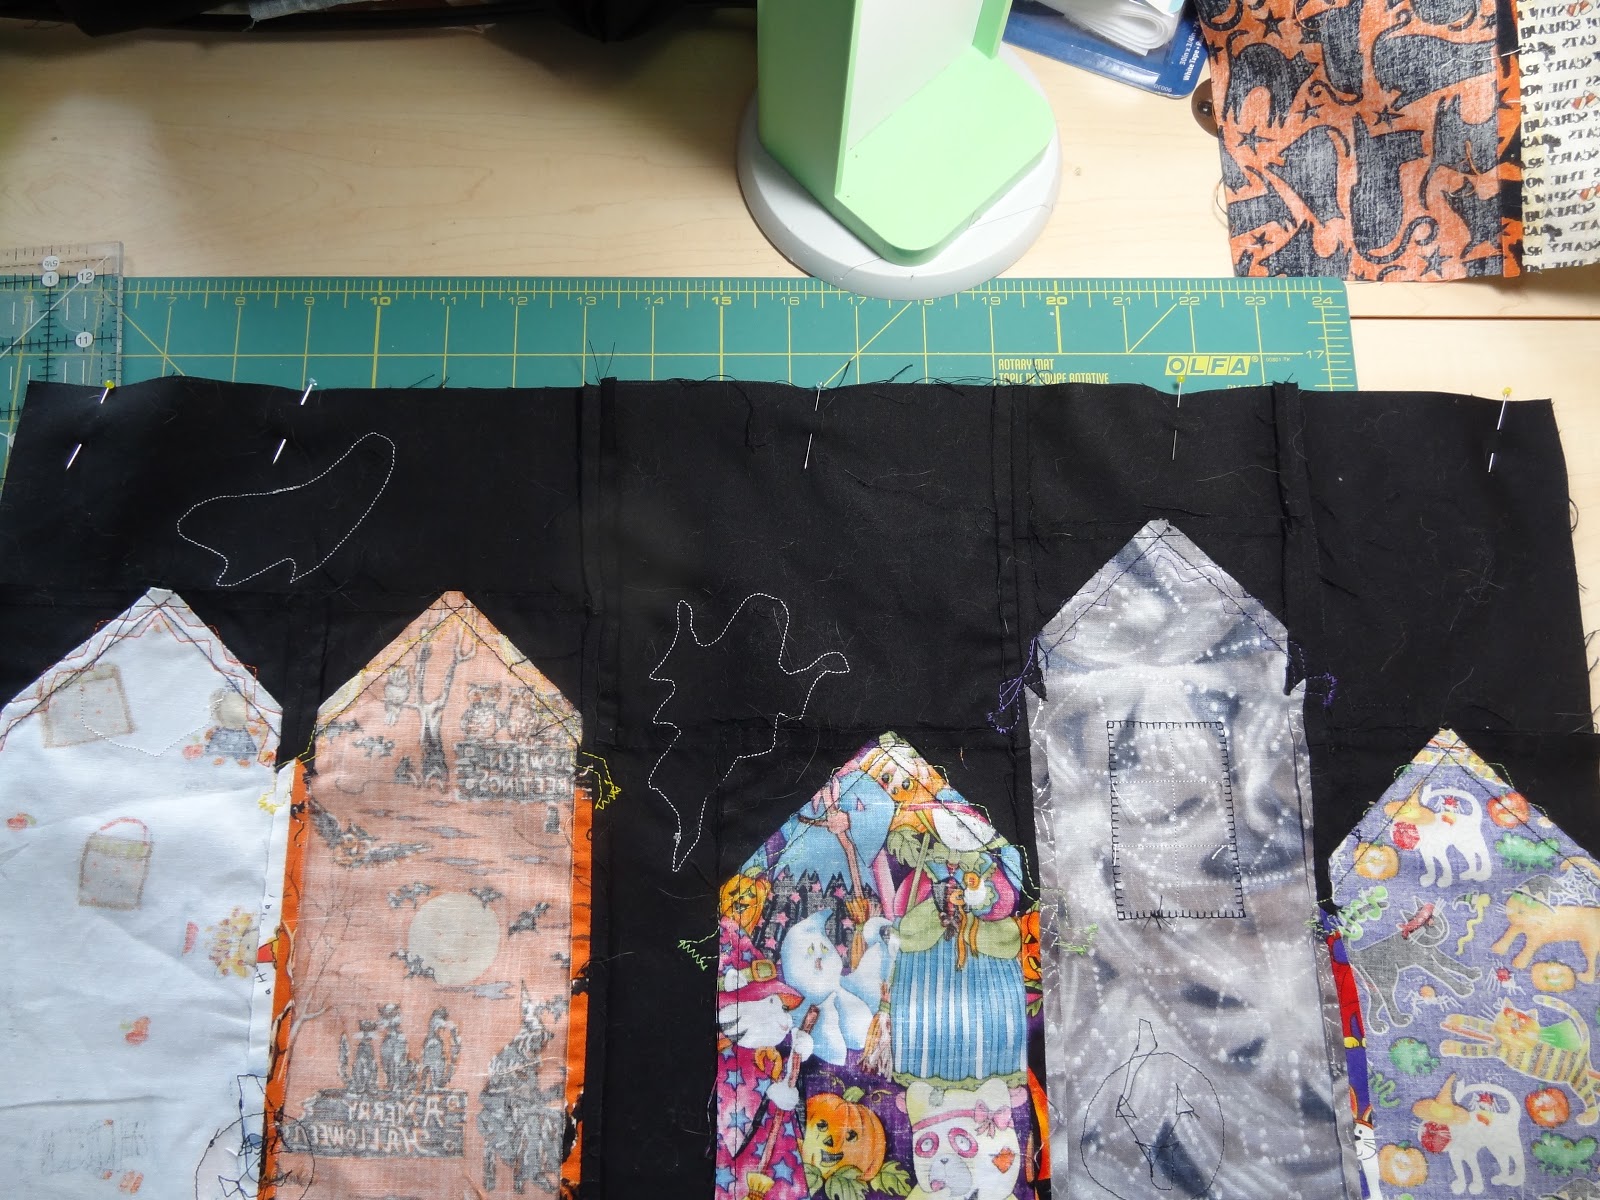
I added up the width of each separate house section until I had a width that worked for me and
made the panels accordingly.
For one side I made house sections 1, 2, 5, and 3.
For the other side I made house sections 4, 5, 2, 1, and 6.


I sewed my panels together and then the fun began!
The embellishments!
I decided it needed some cool roofs.
So rick rack it was!
I used Steam a Seam in a roll to apply the rick rack to the roofs.

Then I fused it into place and began to put on the other fused things.
A moon, some ghosts, a witch's hat etc.
You can find my patterns for them over here
You can find my patterns for them over here
Just get creative with your embellishments!!

I was having fun with this step!


I stitched everything down too.
Sometimes I did a blanket stitch,

Most of the time I did a straight line stitch.
(You can see it here on the back)
Don't forget to stitch your rick rack down too.
I just followed the line of the rick rack and zig zagged the ends.
I also used Fray Check on the ends as added assurance!
After you have all your embellishments done and sewn in place measure from the base of the house to the top of the piece and add the measurements together.
Subtract that from the final number you got for your "Length" above, mine was 39 total and
I had to subtract the measurements of both panels.
This is the amount you need to add in between both panels to make the cover complete.
Pin then sew each panel to opposite sides.


Now comes making the actual cover part.
I cut a piece of the black the same size as the entire cover.
You have to cut a piece of batting the same size too.
At this point you need to put your ribbon ties on the front of the cover.
Measure 6" from the bottom on each side and 6" from the top on each side.
Pin your ribbons there.

Time to layer your cover. First the batting, then the backing and then the top (RST with the backing). Pin in place,
Your ties will be in between the top and the backing.


Sew all the way round leaving an opening for turning.
Trim corners before turning.

Turn press and pin opening closed

Press all the way around and top stitch all the way around.
I did it twice so I didn't have to stitch the opening closed by hand (yes I'm THAT lazy!)
I put a piece of tape down the center and suing my walking foot I stitched down one side.
Then I stitched organic lines all the way to the sewn panels.

I also quilted around the houses, and all of the fused elements.
I added stitched on windows and doors to quilt that part down too.
Here is the finished sewing machine cover, both sides!

**Note the bling on the bottom of this one!**

It fits my BFF's machine perfectly!
I hope you like it Pauline.
I made it so you would have something to remember hosting your first blog hop!
I am so proud of you and how far you have come!
Now it is time to go and visit everyone else that is posting on this day!
Tuesday November 27
I hope you have enjoyed my tutorial!
Please let me know what you think of it.
Thanks for the visit!
~XOP~


67 comments:
Pam, this is darling!! What a fabulous idea -- using it for a machine cover. And using the Halloween prints was brilliant! Pauline will love this, I'm *sure*! :)
Absolutely love your machine cover! Halloween is my favorite holiday also. Great tutorial. Thank you for sharing.
What a great idea. Love how you made it your own, ok, so you are giving it to Pauline, she will love it. But you really ran with the idea. Over the top great!
Your Halloween pillow is so cute.
What a lovely idea - thanks for the great tutorial and I love that you not only made the pillow in a different holiday theme but also as a present too. Very nice.
Wow, that is certainly different! I like it! thanks for sharing!
Very nice Halloween pillow!
What a fantastic take on the pattern, I love it and it was a fabulous thing to do to make it for your BFF :)
Great job, what a good idea!
Happy Christmas...
You are a very creative woman. I love how you turned it into a Halloween project. Thanks for sharing
That's a nice twist on the pillow! What a great idea to make a machine cover. :)
I love your rebellious machine cover. Looks like you enjoyed making it, sew good for you!
Being a rebel is good! Love your machine cover and thanks for the tute!
What a clever spin on the Holiday pattern! I love the way you thought outside the 'box'!
Ohhh it is for Pauline...creatively done!
I love your sewing machine cover, very cute!
Perfect cover!
Very special and turned out great!
Great idea.You are very creative and your cover machine is just wonderful.Thanks for sharing!!
I absolutely love this. I like the idea of taking the Holiday Lane theme and being so creative with it. Instead of a pillow cover you made a sewing machine cover. Very clever and excellent detail.
great idea!!
Love what you did. And how generous of you to share the tutorial on how you did it.
your ghosts are still my favorite part :)
Nice twist on the pattern!
Hi Pam, Could you help me with something? I went to the Pinterest site for the blog hop so that I could re-pin your photo's and I couldn't find them. How do I access these? Thanks, Sue Morris
What a delightful idea. Being the Halloween junkie that I am, I think I must make one myself! :-)
Does this mean that you will now make a Christmas one for your sewing machine? Truly wonderful gift for your friend. Judy C
Your Halloween pillow is just adorable! Great job!
Nice twist to the Christmas houses.
Very festive, way to go against the grain :)
Great idea!! I love your pillow
Greetings from Germany
Nicole
WOW, how cool. I would have never thought of a sewing machine cover. That is really a good idea. Thank you for the tutorial on how you did it. The cover, looks great! Your additions made it all pop and really showed it off.
I can see it now: a Holiday Lane for every holiday. Cute idea to make a sewing machine cover. Thanks for the tut.
You definitely thought outside the box on this one--too cute! Thanks for the tutorial and hopefully you'll join another hop so we can see more of that rebel side of you. :O)
I love that you used a Halloween theme and made a sewing machine cover! Brilliant!
What a wonderful way to use this village! I', sure it will be loved! Great job!
hulseybg at gmail dot com
Will be using this tutorial for my next pillow! Love this idea and love the Halloween fabrics too! My two machines are just crying out for their own covers!
I had also thought this would make a great Halloween pattern. I was going to leave my shapes the same as the snow on the roofs but cut them out of a small spiderweb print in my little daydream. Maybe I will get to it yet!
Very cute in the Halloween fabrics.
What a great project! How cute! Thanks for the tutorial.
OHHH! Do not let my DD see this! She would LOVE it! I will have to make her one!!
How cute. Great way to use the pattern. Thank you for sharing.
What a cute idea. Love it.
its adorable.. you scare me,, ,xLOL
Great pillow!!! I LOVE that you used Halloween patterns!!!
What a clever adaptation. Great job.
Oh that is so cute! I love the added features. I'd like to make something similar. Thank you!
Hi!!! Looks really great done in Halloween style!!! Great tutorial!!! Thanks for the fun!!!
What a neat idea! Great job and lucky Pauline!
Well Pam...I'm speechless. You are definitely creative. Great job! I picture the sewing machine cover in your new sewing room...the fabrics and holiday are 'you'!! It can protect your sewing machine and after I move back to Canada...every time you sit down to sew you can think of me. It's a deal you can't refuse. Thanks for your support and commitment and for sharing your time and inspiration with all of us today...Happy stitching BFF, Pauline
Yours is an original! So cute!
Rosemary B here:
Love it! fun colors and fabrics.
I love sewing machine covers too. I have made many of them. This is a great idea!
That is awesome! Thank you for taking the time to give all the specifics!
Rebel With a Cause!! LOL!! I'm certain Pauline will adore her new machine cover!
Blessings
Gmama Jane
I LOVE your Halloween Lane!
Awesome tutorial! I love your rendition of the Holiday Lane pillow!!! Good for you :)
Totally wonderful! Happy to see you are gifting it to Pauline. Hope you are doing well. I have not been blogging much lately trying to catch up with all my bloggy buddies!
I'd been wondering how long before someone chose a different holiday to highlight a different holiday. Thanks for the tut on the machine cover; yours turned out so cute.
I savour, lead to I discovered exactly what I used to be looking
for. You've ended my four day lengthy hunt! God Bless you man. Have a great day. Bye
Also visit my web blog how to download movies
Such a rebel you are! Just love it!
Fun idea, love your take on the pattern :)
I think it looks fabulous! What a nice present to make for Pauline.
What a cute machine cover!!! You are very creative! Thanks for the inspiration.
Cute, cute, cute! Thanks for sharing with us.
I can say that this is the coolest machine cover yet! PS Love that you won the "guest room vs sewing room" debate. Your son's help in transporting your bins is better than a material gift (no pun intended). I can attest to the fact that having your fabric visible does wonders to what you will accomplish.
Post a Comment
Your comments make my day so much more special. Please, I invite you to share what you think. ~Happy Stitching~