Friday, January 29, 2016

Dreamy Stars is Finished

I've been working on completing some of my unfinished projects. 
 I did not realize how many of those I actually had until I began digging them out!  
 I listed out 12 and each month they choose a number and you are supposed to work on that one. 

 I also joined up the 2016 Finish along
 For that, I made a post and listed projects I wanted to finish in the first 3 months of the year.  
You can carry them over to the next quarters if need be, no penalty. 
 I think there are prizes for finishes.  
Just a little motivation for me along with all the quilts I "need" to finish this year.

The first project for the month of January was my Dreamy Stars quilt.  
All it needed was binding!! 
 I cut out the binding from a vintage sheet.  I love this diagonal gingham for binding. 
 The nice part was that I only had to cut 4 strips for the entire quilt!!


Doesn't it look great?  I used a vintage sheet for the back and I could not love it any more!


It has been cold and GRAY here in MI so this is not the best photo but you get the general idea.


Here is a close up of the quilt.


I was hoping the quilting would show up better but it is really nice.  
My friend Liz did the quilting on this one. 
 Also, note the corner stones?  
They were cut from actual vintage sheets too.  


Sometimes it is difficult to work with this drama queen and all her "help"!


Linking up with Crazy Mom Quilts for Finish it Friday.

Also linking up with the Finish along here
See my original list here

Have a great weekend!!

~XOP~


Wednesday, January 27, 2016

WIP Wednesday

I have hauled out "the mermaid" cross stitch that I began a million years ago. 
 I sincerely desire to finish this project.  This is what it is supposed to look like when finished.


This is what it actually looks like.  See all the "green" there in the middle? 
 That's what I managed to get done in about 2 hours last night.  
This is gonna take a LONG time!  
I also realized that, my old eyes do NOT like working on linen.  
Those uneven holes are killer, even with bright light and cheater glasses!


So this is my current WIP along with this new project that I can't really show much of right now.
These will be turning into a great swap project!


This was my stitching partner for the counted cross stitch.  
She sits on one side and Aiden on the other.  No lack of cat helpers at my house!


Linking up to WIP Wednesday and Let's Bee Social.

~XOP~


Friday, January 22, 2016

A Finish YAY!!

I am happy to report that I finished the pinwheel baby quilt this week!  
YAY, I love a good finish.
  I will definitely be making this one again!!  It was a free pattern on the Moda Bake Shop.  


I used a vintage sheet I had for the backing.  Love it!


I did the quilting myself.


Love the straight lines!


Linking up to Finish it Friday

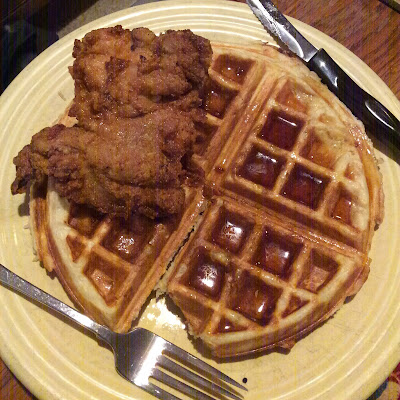
I also wanted to share the amazing dinner my hubby made last night.  
His version of chicken and waffles. 
 It was so good!


Happy Quilting!

Linking to the 2016 finish along here
See my original list here

~XOP~


Wednesday, January 20, 2016

WIP Wednesday

I am still plugging away on binding the pinwheel quilt with the prairie points.  
I am loving this quilt so much. 
 I hope to finish the hand stitching tonight at quilting with my Canton group of peeps.

I finished my January bee blocks.  Interesting, and glad they are done.  


Next up is working on my Chenille blanket. 
 I have three of these I want to make.  
This one was calling my name to "make me first".


Of course someone had to help me.


I needed to finish the stitching on the other side but could not bear to move her. 
 I will get to this sometime this week.


Oh, and just in case  you are wondering, that fox fabric came from Joanne's last year. 
 It was in the fashion section of the store.

What are YOU working on??

and

~XOP~


Friday, January 15, 2016

In Faith Quilt Finish 2015

I had a very dear friend that was diagnosed with Ovarian cancer. 
 Her daughter and my daughter are best friends. 
 I determined to make her a quilt in the fall.  
I finished it and gifted it to her while she was in the hospital.  


I wanted to make something soft and full of prayers.  
So I turned to pastel crosses and low volume backgrounds


I embroidered the label and sewed it on to a soft cream flannel.


She never got a chance to see it.  She passed away the end of October.


Her daughter has it now.  

I hope it will be of some comfort to her and remind her that I loved her mom and that I love her too.


I loved this pattern and am thinking that I need to write it up as it was simple to make. 

 I love how soft and calming this turned out.  

You could easily do it with more manly colors too.


RIP my friend and may God Bless you and your family.

~XOP~


Wednesday, January 13, 2016

WIP Wednesday

I am working to finish up the pinwheel baby quilt.  
I am trying to finish up the quilting. 
 It certainly takes a long time.  The center portion took me about 5 hours!

Lots of straight line quilting going on right here.  
I did a few lines in the small border and decided to mimic that in the larger border.


I'm pretty happy with how this turned out.  I now need to square it up and choose the binding.


I am hoping that this one will be completed soon.  

I would love to be able to cross it off my "finished" list.

Next up are getting my January Bee blocks made and mailed.


~XOP~


Tuesday, January 12, 2016

First Finish of 2016 and A Short Tutorial

That's right, I have one finish so far. 
 I finished that rag quilt that I was making with vintage sheets.

This is a photo of the finished front.


And this is a photo of the finished back.


If you have not made a rag style quilt before you should.  
They are super easy and make great baby quilts!  
I think having one for a winter snuggle would be great too.  
They make good blankets to take to cold football games too.  

I had tons of batting scraps I wanted out of my closet so this is what I chose to do with them.
  I cut them into 4" squares.  
You, of course can cut them any size you like.  
I wanted to use 5" charm squares of my vintage sheets.  
You need your batting square to be 1" smaller than the fabric you are using.  
First thing to do is sandwich you batting between the 2 wrong sides of the fabric you are using.  
If your squares are larger than 5" you may want to spray baste them to avoid slippage.  
I also use my walking foot to make this quilt.  Stitch an "X" on each sandwich.

Here you can see mine all stacked up with the "X" stitched on them.  
You may chain piece this part.
That sure makes it go more quickly!


It is easiest to use your walking foot to assemble the quilt too. 
Once you have all the "X"'s sewn on the squares you sew them together like you see here.
I used 1/2" seams to sew everything together.
One side of the quilt will have all the seams up as you see in this photo.


The back side of the rows will look like this, more like a typical quilt looks


Once you have sewn your rows, then sew them together, matching the intersections as you do.


You are now ready to do the very tedious part, snipping all the upturned seams. 
 I use a spring loaded, short bladed scissors to help my hands out a little bit. 

 It is good to do while watching TV as it is pretty mindless. 
 Make sure you snip about 3/8" apart. 
 A little smaller or larger is no biggie, the only big no no is not to snip into the sewn seam!  
Then your quilt would come apart! 
 If you do that (and I think we all know most of us will at some point) 
take it back to your machine and stitch it back up a bit. 
 If you are not near the machine put a piece of painters tape on the spot 
so you can find it when you are.  

I would say a pin, but I always seem to lose them and then I have 

A) lost my pin and 
                  B) don't know where to stitch!
Both are not good!. 

 Don't forget you need to sew all the way around the outside of the quilt and snip that line too!!!  


Close up of my snipped quilt.  Isn't that bird adorable?


I also loved those butterflies!


It is a technique that can be used with quilting cotton or flannel.  
Flannel makes one HEAVY quilt, but so nice for winter.  

One you have the entire quilt snipped you will throw it into the washer and then the dryer. 
 It will fray/fuzz a bit more when you do and that's exactly what you want it to do. 
 I find that the more snipping, the better the fuzzing, 
so keep that in mind for the look you are going for.  
This is the first time I have used vintage sheets and 
they did not fuzz as much as regular fabric or flannel, but I like it just as much!

I hope you have enjoyed my little tutorial and that you decide to give this technique a try.  
If you do I would love to see your pictures!

Have a wonderful day!

Linking to Finish along here
See my original list here

~XOP~


Saturday, January 09, 2016

Finish Along 2016 Q1

It's time to link up to the 2016 Finish Along!  
You can find the information here, about how to join in the fun!
Link is live until January 16th here

2016 FAL


I have a few things to list here as proposed UFO's

1-Baby Pinwheels:  Needs to be quilted and bound


2-Vintage Sheet rag quilt:  Needs to be sewn and snipped


3-Dreamy stars needs the binding to be hand sewn down and a label made


4-5 I have 2 chenille blankets that are basted and need to be sewn, cut and bound.


6-Amy and Matt's Wedding quilt will need to be bound once it is back from the quilter.


7-I have another Fox Face quilt that the top is finished that needs to turn into a quilt.  
I made two tops at the same time.  
One turned into a quilt and one is waiting.


I think this is as much as I can cram into one quarter of the year.

8-I also have decided to work on finishing some embroidery/cross stitch.  First up is a beautiful mermaid that I started I have no idea how long ago.  


Oh TRUST ME, there are soooo many more!

Are you going to join in and work on those UFO's?

~XOP~