Tuesday, January 28, 2020

Some Selfish Sewing

I have NOT been in the mood to sew lately.  
I think I am still feeling the let down of the holiday and all the sewing I did right up to Christmas.  
I have sewn a few things that were easy and used up some fabrics I had bought that were bulky.  
I had bought some flannel to make holiday pillow cases for our bed but somehow just didn't get around to making them until last night.  

Do you love Narwals?  I do!  
I could not resist making some Christmas Narwal pillow cases!


I have been trying to do some clean up in my sewing room. 
 Somehow I managed to misplace my little hand sewing bag that has all my hand sewing stuff in it.  
I am going on a mission tonight to find that bag!  
I have a quilt retreat next weekend and I need that bag.  
I am trying to determine what project(s) to work on too.  
I signed up for an embroidery class (every month) and of course it is the Sat I will be at the retreat, 
so I am going to have to go on Wednesday of next week.  
I need to spend time gathering the supplies for that this week too.  
Wish me luck with the bag hunt tonight!

~XOP~


Thursday, January 23, 2020

Tribute Star Quilt

I *finally* finished the hand stitching on the binding of the Tribute Star quilt. 
It turned out so well!  
The pattern, Tribute Star, is a free Denyse Schmidt Pattern.


I used Tula Pink's Monkey Wrench fabric for the front and her 
108" wide coordinating print for the back.  
Seriously, the feel of this fabric was amazing!  
The aqua color is just stunning in person too.


My friend, Liz, did the quilting and it is amazing.  Click on the photos to enlarge.  
GORGEOUS!


I got a few up close photos of the star portion of the quilting,
 which shows up much better on the back.  


I chose to do a two sided binding because I wanted the black on the front and purple on the back.
I didn't have anymore of the beetle fabric so I used the black monkey fabric.  


I am very happy with how this turned out.  
I received my fabric from the shop Something Quilty.  
If you need some Monkey Wrench of your own check her out!  
I don't think it is listed in her ETSY shop just yet, but you can ask her.  
She is opening up a brick and mortar shop soon and this quilt will be in her shop as a sample.  
Her shop is located in Wisconsin.
If you want to make one too, she can help you out!  
Just tell her Pam sent you!!!

~XOP~


Monday, January 20, 2020

The Peacock Diaper Tutorial Is Finished!

I know you have all secretly been hoping that I would make a tutorial and pattern 
so you can make your own peafowl diapers, haven't you?  
Well then, it is your lucky day!  
My daughter and I worked on this over the weekend.  
(Mostly because I don't have time to make them for everyone that has asked and 
this will allow them to make their own).  

The actual tutorial is hosted over on my daughter's blog on Tumblr.  
It is called Guardian's Vigil and you can find the master post right HERE.  
She came over on Friday after work and I made the (hopefully)
last one for sale and we documented the process.  
I have drawn pattern pieces for the pouches and the flaps which she has posted along with the measurements for the straps etc.  

This is a photo of one of her birds wearing one of the diapers I made her.


She has a very important disclaimer that we are not responsible 
for any issues with the birds wearing the diapers.  
Make and use at your own risk, basically.  
She has not had trouble with any of the ones I have made but 
I have tailor made them to her exact birds 
(ie, the bird comes with her to my home and we fit the diaper directly to that bird and make the adjustments right then and there).  

All that being said, here are a few shots of me trying to work.  
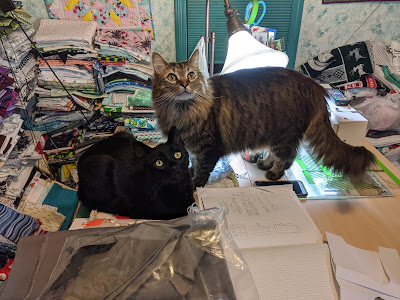
Cole was "helping" us.  
The purple diaper was the last one I made for one of her young birds.  
Surprisingly, the Kaffe didn't hold up very well.  
Good old Kona cotton seemed to be the best!


Eventually Finn joined in (pardon the messy sewing room).


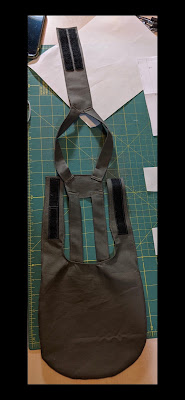
JIC you have not seen a peafowl diaper all finished, this is what they look like.  
This is for an adult bird.  Front and back.


If you go to her blog, you will be able to read all about the process in excruciating detail.  
I had to write as if the people making them had ZERO sewing knowledge.  

If you are here and need questions answered about how to make the diaper, my email address is 

mamaspark@gmail.com

If you are not here for questions, I hope you enjoyed the cat pics = )

~XOP~


Tuesday, January 14, 2020

Self Binding Blanket Mini Tutorial

First let me say that there are MANY tutorials out there on You Tube 
if you are a watch as you make kind of person.  
Missouri Star has one that is done the way I make mine.  You can find it here.  
This will be a quick and dirty how I make them.  
Shannon Fabrics has a free pattern (here)  for the regular blanket and some smaller "Lovies". 
Their You Tube video is (Missouri Star) here and (Shannon) here .
The lovies use an unfinished edge to complete and are so fast.  
All this being said here is what I do.

 Please let me know if you have any questions via email or in the comments, but make sure you leave a way for me to answer you.  
There have been many "no-reply" blogger comments and I have no way to respond to you if you don't leave me your email address.

For the self binding blankets:

You will need 2 pieces of fabric with a 10" difference. 
 This is important to note.  
Most commonly I see 40" and 30" but 
if you only have a yard of one you can still do it with 36" and 26".  
These pieces need to be squares. 
 I have made all flannel, and flannel on the outside with Minky (or a plush of your choice) 
on the inside or the you can do it the other way around too.  
I find using the plush on the inside is easier, but you do you!

Surprisingly I have found making the fabric squares to be the most difficult part (or almost). 
Once you have both squares cut you will need to mark the centers on all four sides of both pieces. 
 I used a pin.  
Place the pieces right sides together and beginning on one side pin from the center 
to the edge of the smaller piece.  
You will also need to mark 1/4" at each corner on the wrong side of the smaller piece. 
 I used a marker and made a dot that I could see.  
Don't worry as you pin, the top and bottom pieces will NOT line up.  
This is so you can make the corners as you will see.  
You can see these steps below.


Continue to pin like this all the way around the blanket.  
You will be sewing soon and need to have an open edge so you can turn the blanket so make sure to leave a hand sized opening when you pin along one edge.


You can see the dot in this photo. 
 I begin sewing near the area I want to leave for the hand opening and sew toward the dot.
 You will use a 1/4" seam allowance. 
 Finish sewing at the dot.  This is important! 
You will start sewing from then on at the dot too.   
Don't worry if your corner "tails" don't match up well.  
I'll show you why in a minute.


Once you have sewn all the way around (except for the hand opening, don't forget!), 
you are ready to deal with the tails.
You can see in the photo below that I have folded my outer edges 
(with the center fabric inside) together.  
This brings the corners together.
As you can see below, my tails didn't line up very well. 
 It doesn't matter. 
 I can't even tell you how I stressed over this on the first one I made. 
 No stress you guys!


Once you have your outer edges folded in toward each other 
you are going to use your ruler to draw a sewing line.  
You can see that I lined up the straight line of my ruler along the fold I just created.
I put my pen right on the place I started and ended my stitching
 (where the dot would be if we had put it on the outside, which we did not). 
 Once you have your pen there just draw a straight line. 
 You can pin if you like .  
Once your line is drawn it becomes your sewing line. 
 Do this on all 4 corners.


Put your needle down right where your stitching ends and you put your pen for your line to begin.


Sew straight down the line.  You will repeat this for all 4 of your corners.


 PHEW!  You are so close to being finished!  Look at you go! 

Next is the trimming.  
Using scissors, trim approximately 1/2" from your sewn line. 
 If you are concerned that you may have sewn it incorrectly you can put your hand into the opening you left and pull out one corner to check it.  
Simply push it back to how it was originally and trim if all is well. 
 If not, pick the stitching out and try again. 
 Hopefully it is right though!


I trim off another little bit where you can see in the photo below to help make the turned point crisp.
Just be careful not to cut into your stitching!


Here comes the moment of truth.  
You are going to get to birth your blanket now!!! 
Stick your hand inside the opening you left 
(hopefully you remembered not to sew it shut!) 
and pull your blanket to the right side.


It will need a good pressing at this point.  
You may have to work your way around and make sure to get all your corners pointed out and your edges lined up, but once you do just press.  
You can really only press on the flannel part but don't worry the Minky will fall into line!


 Now you have that hand opening to deal with.  Turn under the flannel and the Minky about a 1/4" 


 Pin that edge together, as you see in this picture.  
I start my sewing right before the pinned opening to make sure I catch everything in when I sew.  
You will continue to sew around the blanket on the seam line between the inside and outside fabrics.


You can use any stitch you like. 
 Sometimes, I begin with a few straight stitches to anchor the stitching and 
then proceed with the decorative stitch.   
If you happen to like the one I used I took a picture of the setting on my Bernina.  
It is stitch number 4, elongated.  
Try out some stitches on some practice fabric to make sure you like what you chose.  
Some people zig zag, I happen to love this stitch.


My stitch looks like this on the front, 


and this on the back.  
When I get back to where my stitch meets up I switch to a straight stitch and 
stitch about half an inch in the ditch.  


That's it.  You're done and you have completed your first self binding blanket! 
 I hope this tutorial is clear. 

 If you have questions please email me at mamaspark@gmail.com and 
I will try my best to help you.  

Here are a few pics of some of mine.


If you make a self binding blanket from my tutorial I would love a link back to me here. 
 I would also love to see your finished blankets!

Have a lovely day and happy stitching!

~XOP~


Thursday, January 09, 2020

Some New Year Finishes

I always pick up flannel and Minky (and sometimes lux fleece) remnants when I go to JAF. 
 I have amassed quite a few of all of these.  
I use the flannel for burp cloths and we not sure about the Minky.  
Until I figured out how to make self binding blankets! 
 Shanon fabrics has a free pattern and there are LOADS of video tutorials on You Tube. 
 I will show you how I did mine tomorrow though, just in case you are interested. 
 I did it quickly and late at night last night so...take it for what it is, LOL.

Anyway, I have made a bunch of blankets and used up a lot of the stashed fabrics! 
 YAY!! 
Here we go!

The 2 fox blankets were made using Lux Fleece for the center and 
flannel for the outside and borders.  
All remnants!


These next two were purchased fabric.  The whales and plaid are flannel with Minky inside.


This one is my favorite!  The outside is flannel and the inside is a fleece (I think).  
I have enough of the inside to make a second one but no more of that flannel, 
so I need to go get more of that.


I cut the plaid wrong and ended up with smaller pieces so when life gives you pieces, 
make a new plan!  
The Shannon fabrics website had a pattern for "Lovies".  
The back was 20" and the center I cut to ~14". 
 I was able to get 4 out of my mis-cut and a remnant I already had.


I had some larger pieces of flannel so crib sheets were made too.

I have put these 2 in my ETSY shop (clicking on the link will take you there) 


I am holding on to these as I have a plan (it's a secret plan at the moment though)


I had some regular cotton so made this crib sheet with that.  Daisy Kingdom fabric, so precious! 
This one is in my ETSY shop too.


Last night I made some burp cloths to go with the fox blankets. 
 Isn't that plaid on the back adorable?
I had the deer fabric left over for another set of sheets I made so use it up in these burp cloths. 
 I am not listing these (yeah, yeah, secret plan) but there are several others in my ETSY shop if you are in need for yourself or for a gift.  
These flannel burp cloths are so great for cleaning up everything with a baby!


I have made something every day now for the last 8 days!
CLEARLY, I can't keep that up!  
I did just get a quilt back that now needs to have binding so will work on that.
I made another chenille blanket that I have to photograph.
That (and some of the blankets) will end up in my ETSY shop too.
I need to get measurements first.

I am seriously hoping that I can continue to be so productive this year.
The 2 BIG "have to" quilts are a graduation quilt (top is finished, just needs to go to the quilter)
and a wedding quilt, which I finally have a plan for.

Are you a list maker?  
What things are on your "to do" quilt list for this year?

~XOP~