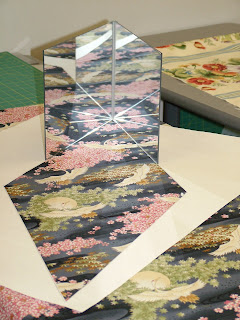
This is Yuki working with her cardboard window and mirror to view potential stars.

Here is what the start looked like using the cardboard preview window and our mirrors. This one is Yuki's.

This one was mine.

This one was Ellen's.

Here is Ellen acting like a goof. I am *certain8 she will KILL me for posting this one. I guess next time she will smile nice!!

Here is Yuki, *trying* to figure out where she wanted her star to go. It was a difficult choice!

Behind me is the class example. It was really spectacular. I chose the dragon fabric because I wanted to make this for my DD#1 and she loves dragons and purple!

Here is Kimber's top. She had the most difficult time trying to make her star because there were bare spots without a lot of interest in some of her fabric. I think she made a good choice for final placement. She used denim like fabric for her background. She wanted a western look.

I really liked this one. The ribbons gave it such movement and of course I loved the dragonflies too.

Yuki just sent me this. She finished her top at home on Sunday. Isn't it great!!? I just love her fabric choice!

Ellen chose an oriental fabric with cranes on it. It was neat because the wings made fantastic circles. It kind of reminded me of a hurricane!

This is how my top looked. We had to sew the quilt top together in quarters. I got an entire half sewn together and then one quarter. I just put them all together for the photo. Isn't it spectacular?? i relly loved it!!

I took a couple of close ups too. This is what the center will look like once it is finished.

This shows the actual diamond I used.

This class was so much fun. The technique was not as difficult as I thought it would be either. I think I will make more of these. I did get a couple of nice tips from Mary and Judy (the teachers). Mary brought tissue boxes, (you know, the ones where the tissues pop out of the top?) and we kept them at our sewing table to use for threads and scraps. You could also keep one in the car for trash. Judy showed us a way to keep your rulers so they won't get broken during transport. You know those cardboard bolts that are left over when you buy your fabric? She used those, put 3 elastic bands that she had safety pinned together around the board and slid her rulers under the elastic. Isn't that a great tip?? Let me know what you think of the class and the finishe (almost) projects!!

4 comments:
WOOOWWWWWW! Thanks for the great photos -- what fun!!!
neat, I was so picturing the a lone star quilt where you piece small diamonds to make a big diamond & then I saw the auditioning template - I was flabbergasted until I saw the sample - then I thought neat, now that is clever. & Immediately, I could do that with a cat print, luckily for me I do not have the yardage :o) Loved the one with the crane, the spinning motion is really emphasized well using the diamonds. I hope your daughter likes her dragons.
Great quilts. Looks like everyone had fun.
Excellent! I love the effects... I have used the same fabric as Yuki to make the stacked 4-patch posies. Your dragons are spectacular, your daughter will LOVE this!
Post a Comment
Your comments make my day so much more special. Please, I invite you to share what you think. ~Happy Stitching~