
Cori and I talked and we decided to post today so those of you in the US that have a long weekend
could use it for sewing!!
This is the fun part.
could use it for sewing!!
This is the fun part.
The sewing begins. I used 1/4" seams for the entire project.
An accurate 1/4" seam is important in this quilt.
Match up one white charm with one colored charm.
If you are using your Clearly Perfect it will look like this:

If you don't use the CP or the Angler,
you can draw a line corner to corner and sew 1/4" away from either side of the line.
you can draw a line corner to corner and sew 1/4" away from either side of the line.

Your squares should look like this when you are finished sewing.

Use your ruler to cut the HST units apart like this
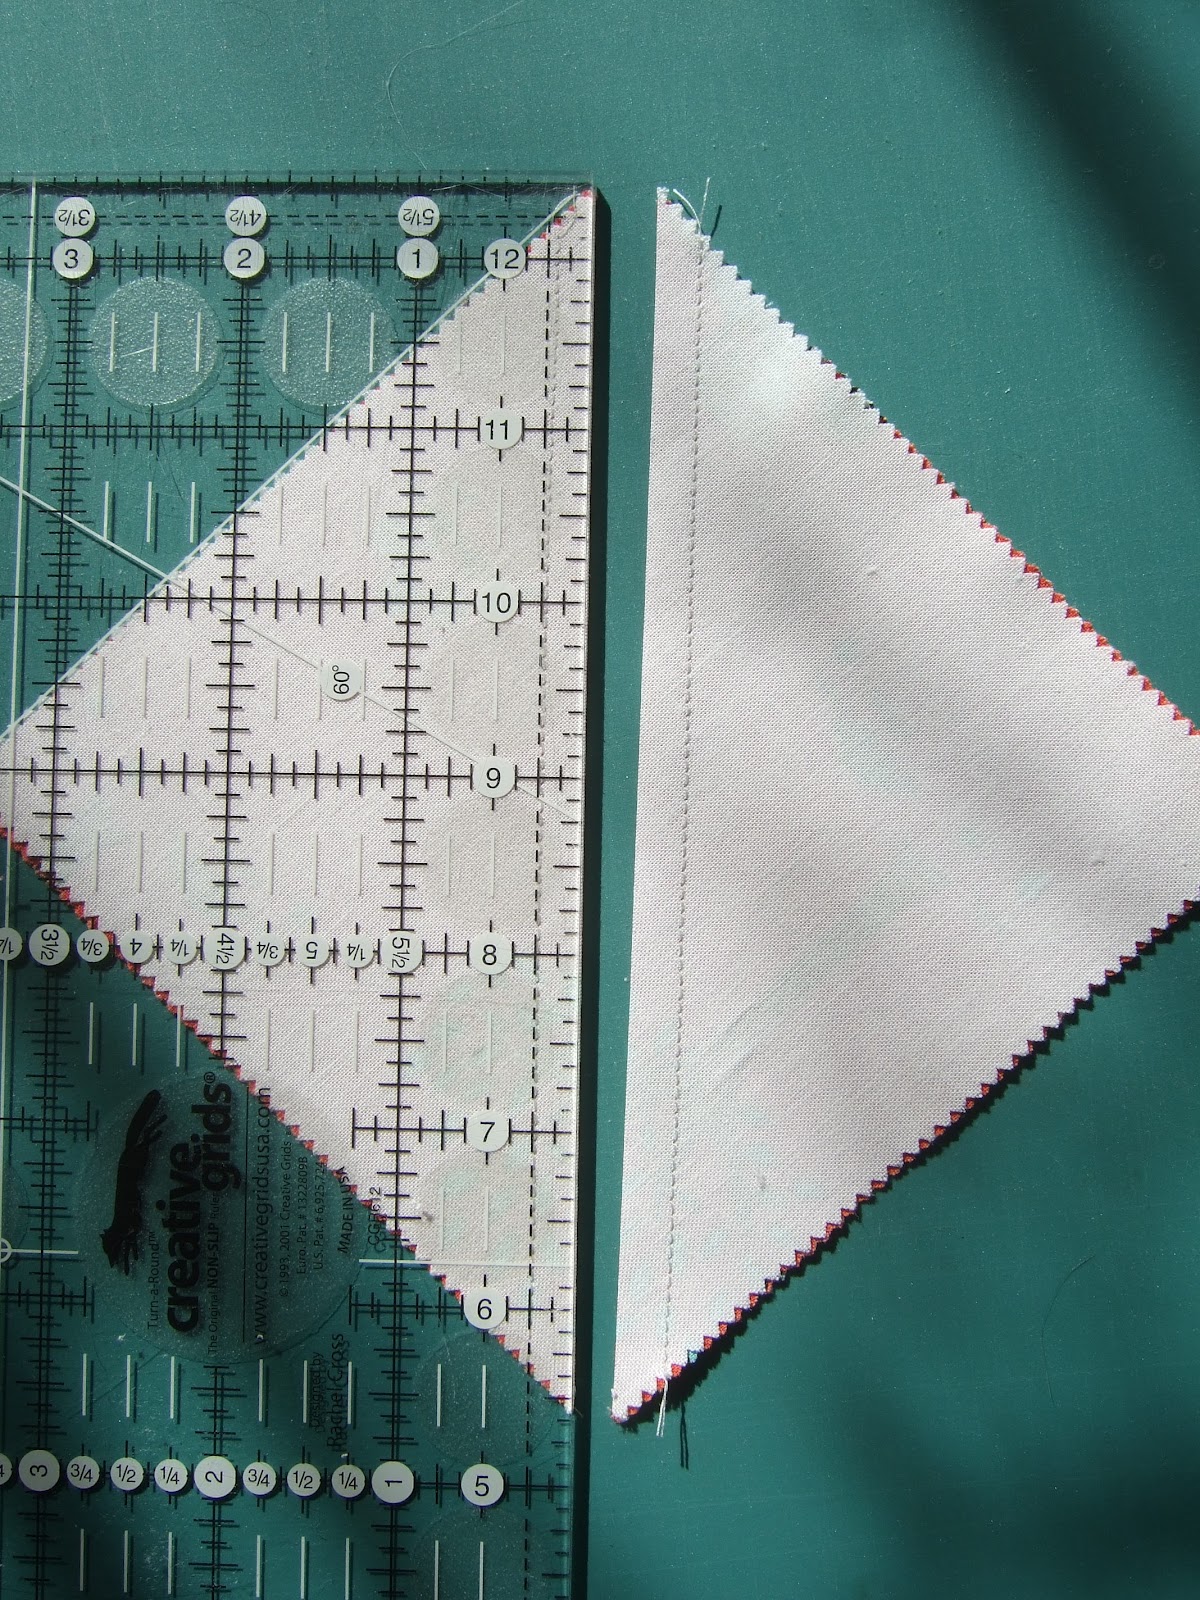
This will yield 2 HST units. Press to the colored side.

You will need to trim the blocks to 4.5" square.
I use a 4.5" square ruler because that makes it easy.
Line the diagonal line on the ruler up with your sewing line and trim all 4 sides.
This is where having the turning mat makes your life a lot easier!
I use a 4.5" square ruler because that makes it easy.
Line the diagonal line on the ruler up with your sewing line and trim all 4 sides.
This is where having the turning mat makes your life a lot easier!


Wee lots of trimming!!

You will need to make 130 HST units!

Lay out your quilt center so that you are happy with the color placement.
You will need to lay it out 10 X 13 blocks.
You will need to lay it out 10 X 13 blocks.

Sewing the rows together can be a little tricky to keep track of them.
My method is as follows:
My method is as follows:
Starting on the left side stack up the HST blocks left to right,
with the left always going on top of the right.
I pin the entire row together, then stack the rows top to bottom.
Now when you go to the sewing machine take the top pile.
This will be the top row.
Unpin one stack, and put that pin in the first square on the top, remove from the pile and
pair it up with the square directly under it.
Sew these 2 together on the right side.


Go back to your stack and put a pin in the top HST block.
Repeat as you did with the first 2 until all 5 pairs are sewn.
You can chain piece this way and your row is all together!
Cut your first 2 pairs apart keeping your pins always aligned to the left.
This way you know how to sew them together.
It should be pin:no pin {sew together} pin:no pin.

Sew like that until you have the entire row sewn together.
Press seams in one direction for the even rows and the other direction for the odd rows.

I like to lay my rows out as I go along to make sure I have sewn correctly.
My fancy design wall is an afghan over the couch behind my sewing machine!
My fancy design wall is an afghan over the couch behind my sewing machine!

Since you have pressed your seams opposite as you went along
it will be much easier to sew your rows together as you go.
Your seams should "nest" and you will be able to carefully position your pin point to point
as seen in this photo.
This should help you to not cut off any of the points as you go along.
it will be much easier to sew your rows together as you go.
Your seams should "nest" and you will be able to carefully position your pin point to point
as seen in this photo.
This should help you to not cut off any of the points as you go along.

Once all your seams are pinned you can begin to sew your rows together.
Make sure you are using 1/4" seams!
I sew right up to but not over my pins.
Make sure you are using 1/4" seams!
I sew right up to but not over my pins.

Once your rows are sewn they should look like this.

I like to turn my rows over and press on the back first.
It doesn't matter which direction you press these seams.
Then flip the rows over and press on the front.
It doesn't matter which direction you press these seams.
Then flip the rows over and press on the front.

Continue to sew until you have all your rows sewn into a center for your quilt.
If you are lucky you may have your quilt inspector helping you too!
If you are lucky you may have your quilt inspector helping you too!

This is the most labor intensive part of the quilt.
The sewing directions for the borders will be posted on May 28th so please stop back for those.
The sewing directions for the borders will be posted on May 28th so please stop back for those.
Remember we would love you to post your progress in our Sliced Apples Flickr group.
There will be prizes but you have to post photos of your progress to be eligible for them!
There will be prizes but you have to post photos of your progress to be eligible for them!


4 comments:
neat thanks i will have to try this
Just found this fun QAL and I'm going to join too!
I'm joining...still waiting for the white charm pack before I can start sewing the center!!
It looks like great! I like it!
Greets vom Vienna/Austria - Karin
Post a Comment
Your comments make my day so much more special. Please, I invite you to share what you think. ~Happy Stitching~