If you are making a purse these are the next steps. Cut your quilted fabric into an 18 inch square.

I had you cut binding at 2.5". You will need to join your 2 strips and then press in half, just like binding on a quilt.

Attach your binding to your square, just like you do your quilts. I machine stitch mine on one side and hand turn and sew it to the other side.

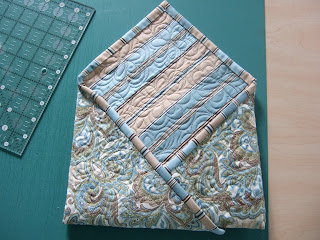
Now you will need to fold your square in half to make a triangle. It is important to note the side you have on the outside just now because once you sew and turn it, this will be your inside! So you will need to make a design decision about that now.

The next step is to measure over from the bottom point 81/4" and up 7". I marked mine with tape next to my ruler. You will stitch on the side where the ruler is (you can see I marked it on the tape!)

You will mark and sew on both sides the same way.

Here comes the fun part! Turn the points back on themselves as shown here. Here goes the first one!

It should look like this with the first point turned.

Now do the same for the second side. Your bag should look like this now.
At this point you will need to hand stitch around the bag along the binding.

I take a few extra stitches where the corner of the binding attaches to the bag. It should end up along the crease on the bottom of the bag.

I will post the next steps soon! Let me know what you all think so far, easy, right?

 I had you cut binding at 2.5". You will need to join your 2 strips and then press in half, just like binding on a quilt.
 Attach your binding to your square, just like you do your quilts. I machine stitch mine on one side and hand turn and sew it to the other side.
 Now you will need to fold your square in half to make a triangle. It is important to note the side you have on the outside just now because once you sew and turn it, this will be your inside! So you will need to make a design decision about that now.
 The next step is to measure over from the bottom point 81/4" and up 7". I marked mine with tape next to my ruler. You will stitch on the side where the ruler is (you can see I marked it on the tape!)
 You will mark and sew on both sides the same way.
 Here comes the fun part! Turn the points back on themselves as shown here. Here goes the first one!
 It should look like this with the first point turned.
 Now do the same for the second side. Your bag should look like this now.
 At this point you will need to hand stitch around the bag along the binding.
 I take a few extra stitches where the corner of the binding attaches to the bag. It should end up along the crease on the bottom of the bag.
 I will post the next steps soon! Let me know what you all think so far, easy, right?

1 comments:
I admired this purse the first time you showed one for a gift. This is one on my 'to do' list. Thank you for doing the tutorial.
Post a Comment
Your comments make my day so much more special. Please, I invite you to share what you think. ~Happy Stitching~